Showing posts with label crafts. Show all posts

Thursday, April 12, 2018

Clothes Pin Apron

Save your back, save money and reduce carbon emmisions with one litle sewing project!


Is your power bill higher than you would like? Well here is a way to save some money with a quick little sewing project to spur you along.

The average clothes dryer uses 3 kW of power and the average family of four does 9 loads per week. At 45 minutes per load, that is 20.25 kWh per week and 1053 kWh per year. In comparison, the average refrigerator running 24 – 7 uses about 500 kWh per year. Where I live, power costs 37 cents per kWh + other fees so a dryer costs about $400 per year on average for the average family of four.

So then, why not hang your laundry outside in the sun? I happen to have the best view in the world for hanging laundry so it’s a no-brainer for me. 


Now you may have memories from your childhood of hanging out laundry using a bag of clothes pegs that was hung on the clothes line day in and day out and hosted occasional spiders, pine needles and other detritus in addition to the clothes pegs. Who wants to hang up their clothes with them? So here is the solution – a clothes peg apron. It’s cute, lives in the laundry basket, not outside with the bugs, and your clothes pegs are always within reach. 

A good friend of mine gave me her apron several years ago. Her husband’s sister made it as a school girl in Germany in the 1950s. Alas it is now on its last legs.

So I decided to clone it and make a new one. In fact, I made three. One for my husband’s daughter for Christmas, one for my sister-in-law for her birthday and now one for me!

So here is how I did it:

Materials:
1 ½ yards medium weight cotton (I used leftover fabric from a quilt I made for my daughter)
Thread to match

Cut 5 pieces:
1 – 25 inch wide, 22 inches long for main apron piece
1 – 15 inch wide, 13 ½ inch long for pocket (can use contrasting fabric)
1 – 18 ¾ inch wide, 4 inch long for waistband
2 – 28 inch wide, 4 inch long for ties                                                                                                                                       

Assembly (5/8 inch seam allowances unless otherwise stated):
  1. Fold and press sides of main piece at 1/4 inch and then fold again 3/8 inch and press. Topstitch at 1/4 inch from edge.
  2. Fold and press hem of main piece at 1/4 inch then fold again 3/4 inch and press. Topstitch at 5/8 inch.
  3. Mark pocket piece at 4 inches from each bottom corner along bottom edge. Mark each side 9 inches from top. Fold and press each corner starting and ending at the marks. Trim the resulting triangle diagonally 5/8 inch from fold. Press in the remaining sides and bottom at 5/8 inch.
  4. Fold and press top edge of pocket at 1/4 inch then fold again 3/4 inch and press. Topstitch at 5/8 inch.
  5. Center the pocket piece 6 inches down from the raw edge of the top of the main apron piece. Topstitch at 3/8 inch from the folded edge in a continuous seam starting at the top corner of one side and finishing at the other top corner, leaving the top edge unsewn. Topstitch again close to the folded edge.
  6. Sew long machine stitch at just under 5/8 inch and again at 3/8 inch along top edge of main piece. Gather to a final width of 18 3/4 inches to match the waistband.
  7. Sew one short end of each tie to each end of the waistband. Trim to 1/4 inch and press open.
  8. Fold waistband/ties piece in half lengthwise, right sides together. Sew across tie ends, pivot and sew until 1/8 - 1/4 inch from waistband seam (this will make it easier to finish the waistband). Trim tie seams to 1/4 inch, closer at corners, turn and press ties.
  9. Pin waistband to gathered top of main piece and sew. Trim to 1/4 inch. Press unsewn waistband edge at a scant 5/8 inch, trim to 1/4 inch and pin pressed edge in position with about 1/8 inch overlapping the previously sewn seam. With right side up, stitch in the ditch starting and finishing 1/8 - 1/4 inch either side of waistband (ie on the ties) to close the little gap left in the previous step.
  10. Press. Fill the pocket with clothes pegs. Get the laundry out of the washing machine. Put on your new apron and hang out the clothes.

Enjoy!

Saturday, September 24, 2016

Quilt for my daughter

Two years ago, my daughter Amy asked me if I would make her a quilt. I have only made two full size bed quilts previously. One was for my parents' 25th wedding anniversary in 1975, which I pieced and appliqued all by hand!! By the time I got to the quilting, I was a surgery resident working about 100 hours per week so my progress slowed down substantially - well it came to a standstill to be accurate. Eventually I paid a Mennonite woman in Ontario, where I lived at the time, to finish the hand quilting. She charged $50! It's still on a bed in the cabin in Georgian Bay although much faded now.

My second quilt was a wedding present for my sister and her husband back in 1990 and I did it all by machine. Much faster than making it by hand but of course, it doesn't look quite as good when you look closely. I managed to find an old photo that I took when I was basting the layers together but none of the finished project.

And I did do a wall hanging quilt of the map of New Zealand a few years ago. It was full of 3 different sizes of squares and rectangles and let me tell you, the rectangles were a bit of a challenge! It turned out pretty well though and hangs in our stairwell. I think I made the Southern Alps a little too white though! You can't see them very well on the photo but I put buttons on the main cities including a sailboat button for Auckland (the City of Sails) and a heart button for Christchurch (home is where the heart is!).


So in June 2014, Amy and I got together and designed her quilt using the 1-2-3 Quilt program. She chose 3 block designs - Star puzzle, Sister's Choice, and 4 Patch Block #1. She has a queen size bed and we planned a 6 x 5 block quilt with 12 inch blocks and 3 inch sashing plus border. Her mattress is 12 inches deep so it had to be quite large. Amy chose 5 colour schemes: blue, green, red, yellow and orange. As we live in opposite hemispheres, I had to choose the fabric but there were a lot of WhatsApp photos that Amy reviewed before purchase!

It took about a year of on again off again sewing to make all the blocks. Here are examples of two of the designs. Can't find a closeup of the third.


It took about a year to finish all the blocks. As the quilt was 6 by 5 blocks and there were 3 patterns and 5 colour schemes, it turned out to be impossible to create a symmetrical pattern with the blocks. So I just tried to strike a reasonable balance of designs and colours across the quilt - a good test for ignoring my perfectionest tendencies! 


We chose an off-white/cream colour for the sashing and I used the foreground colours from the blocks for the squares where the sashing strips met. The quilt measured 94x79 inches before adding any border. I made the border 4 inches longer on the top so there would be enough quilt to cover pillows and used the leftover material from the blocks. The final size before binding and quilting was 107 x 95 inches.


I bought a king size sheet for the backing and it wasn't long enough so I added some coloured strips at the top. That way it would look more interesting when the quilt top was turned back on the bed. I taped the backing onto the tile floor in our front hall, then added the batting (polyester as Amy is allergic to wool) and the quilt top. I pinned all the edges and across the middle than hand basted at 5 inch intervals. I should have basted a little closer together I think, especially as the sashing fabric turned out to have a little more give than I would have liked. After 8 hours on my hands and knees over 2 days, I was ready to quilt!

I quilted by machine using a walking foot, 2.5 mm stitch length, and stitched 1/8 inch from the seams of the main block pattern pieces using cotton quilting thread that matched the block main colour. I used a variegated thread along the edges of all the sashing. Wisely or unwisely, I decided to put a pattern in the sashing. I chose a cable/rope pattern and, becasue I knew I wouldn't be able to sew it perfectly, I used off-white thread to match the fabric. I made a little loop design so that I could continue across the whole width of the quilt. 


I traced the pattern onto the fabric before quilting it using a non-wax based carbon paper that I had bought in Toronto a couple of years ago. Unfortunately I ran out and had to buy some wax based carbon paper here in Christchurch and some of it was difficult to remove. When quilting the rope pattern, it turned out to be very diificult not to push up folds in the fabric, even using the walking foot. So there are a few, well more than a few, ugly bits. 

Cable template
It was quite a mountain of fabric to manipulate under the sewing machine. I think next time (if there is a next time!), I'll quilt it by hand and not worry about how long hand quilting takes.

After the quilting I added a narrow blue binding. The different colours of quilting thread look kind of cool on the back of the quilt but I didn't remember to take a picture of it. 


After quilting for about 5 hours a day for 10 days, I finally finished just in time to take it with me to the US in June. I had to put off taking out all the basting threads and washing off all the carbon marks until after I got there. I wish I had a photo of Amy and me hanging over her bathtub desperately trying to scrub out all the markings. Then to my horror, I discovered I hadn't quilted one of the 4 seams on one of the sashing rectangles. Fortunately I have a good friend in California with a sewing machine and I had brought along my various colours of threads just in case this type of scenario occurred. So at last, after a couple of days of drying, the quilt was finished. I almost forgot to take a photo but managed to throw it on the bed just before I left town. Ta da!

Knitting Updates

 I knit the Pan Am jacket a few months ago and it has been perfect for the cool spring weather. The pattern is from Ravelry and you can see my detailed blog post there as well.  I used Ashford Tekapo 12-ply that I bought from the Hands Ashford store in Christchurch. I lengthened the sleeves and body as the wool is quite warm so, if I am going to wear it, I will probably want to be well covered. The pattern was a nuisance to figure out but there are some helpful hints by other knitters on the Ravelry website, which helped a lot. The border took forever! Don't think I'll make it again but I do love it.


I have two other sweaters on the go.

One is for me - the Whippet cardigan in Holst Garn Nutmeg that I ordered online from Yarn Glorious Yarn. I'm a little bogged down in the sleeves. I started using the Magic Loop knitting technique from Knitting Daily but I didn't have a flexible enough circular needle and the pattern was looking ugly at the 2 turn points so I have switched to double pointed needles, which hopefully will make it less ugly.


The other sweater is for my sister - the Lightweight Raglan Pullover from PurlSoho in Linen Quill Kiln Red as demonstrated by my granddaughter. It's a breeze to knit so far.  The bottom will need serious blocking as it rolls up in spite of the cording stitch.


Everyday blouse by House of Pinheiro

Over a year ago,  bought a cute giraffe print on a navy background from Blackbird Fabrics with thoughts of making a dress for my granddaughter. But I decided the fabric was too dark for a little girl. Then I thought it would make a nice blouse for my daughter to wear to work as she is a pediatrician. But she has specialized in pediatric ICU now and wears scrubs to work all the time. So I decided to make a blouse for me!

Because of the biggis print, I didn't want too many seam interruptions on the front so I chose the Everyday Blouse, which I downloaded from the Upcraft Club website. Here's an example make from the website. Everyday Blouse
The fabric is a polyester crepe, 59 inches wide, and I bought 2m. For interfacing, I used FashionFuse Soft Knit 40 g/m2 from Hawes and Freer. As I am short-waisted, I shortened the bodice by 3/4 inch. I made no other adjustments. I prewashed the fabric on a cold, gentle cycle machine wash.

When cutting the fabric, I lined up the front and back so the pattern matched below the front dart. I cut each sleeve separately and tried to line it up so the pattern on the sleeve matched the front below the dart. I made a size small.

Equipment: Janome Memorycraft 6600 Professional, thread tension 4, stitch length 2.2mm; Brother 3034D to overlock seams (3-thread); 14 universal needle.

The pattern directions were excellent - very easy to follow with more detail than on 'big 4' patterns. It was a little fussy to do the elastic at the shoulder but the directions were very clear so there were no mistakes! Also remembered to make sure the front and back lengths matched up before hemming as the front and back are not sewn together all the way to the hem.

I was pleased with the result. The shirt has a very relaxed fit and is comfortable. My one issue was that the lower sleeve below the dart was rather tight - and I have pretty thin forearms. If I were to make it again, I would allow another half inch at the sleeve hem, tapering from the elbow. And I might just leave out the sleeve dart as the sleeve seems to hitch up just a little along the seam below the dart.


Wednesday, August 31, 2016

Vogue 7975 wool jacket

I am about to start a wool overcoat for my husband. In anticipation of this, I took the Expert Sewing Techniques for Jackets online course by Sarah Veblen, Essential Guide to Tailoring (both the Structure and Shape and the Construction classes) by Alison Smith, and I decided to sew myself a basic tailored jacket first. I highly recommend the classes, especially the one on structure and shape. This turned out to be the best fitting jacket I have ever made.

I used the following materials:

  • Loose weave Italian wool plaid 1.7m of 154cm wide; bought in Brisbane Australia at Beth-Wyne Couture Fabrics.
  • Cotton sateen for the facings (thought the wool would be too itchy on my neck) from The Fabric Store in Christchurch, NZ
  • Polyester lining from Haralds in Christchurch
  • Vilene 410, a fusible interfacing with stabilizing vertical threads, to interline the front pieces of the jacket and the welt  (made a huge difference with the ravelly wool fabric) from Stitches from the Bush in Australia
  • Fashion Fuse soft knit 1708 interfacing to interline the remaining pieces from Hawes and Freer in Auckland, NZ
  • Fashion Fuse Light Canvas from Hawes and Freer
  • Domette columbine for the sleeve head from Bias Bespoke (I bought a small amount on Amazon)
  • CLR 3002 shoulder pads from Hawes and Freer (max 4mm thickness)
  • Gutermann polyester thread
I used the Vogue 7975 jacket pattern View B Size 12 but with welt pockets - very basic with no collar and no buttons. I first made a muslin with broadcloth. Based on that, I shortened the bodice by 1/2 inch, reduced the breast point by 1/4 inch, took in the bottom edge 1/4 inch on the back side of the side front and both sides of the back and side back. 

I cut out the pieces on a single layer so that I could line up the plaid perfectly. The fabric was super ravelly so I interlined all the pieces with fusible interfacing (see above for details). Here's the interlined back piece.


I used Alison Smith's Speed Tailoring method for the canvas attaching it with fusible interfacing at the armscye and shoulder. I didn't use any tape (forgot - oops!).
I made the sleeve head from domette and attached it using Alison Smith's method, tracing it off the sleeve pattern and attaching the top edge with an ease stitch.  I then using a herringbone stitch to secure the bottom edge. After inserting the sleeves into the jacket, I attached the shoulder pads after first moulding them over a ham - see how they are sticking up like wings with the jacket inside out? As they were so thin, I didn't add anything to the front and back pattern pieces and it turned out fine. I used Sarah Veblen's method of attaching the shoulder pads - rather loose tacking stitch at shoulder seam at neck and about 1 1/4 inches of herringbone stitch at the arm edge.

When attaching the jacket to the lining/facing, I used Sarah Veblen's method of doing corners. You don't turn corners during a seam but sew right off the edge and start again. Then you go back and reinforce the seam starting 1-2 inches before the corner, going down to a small stitch length (I used 1.2mm) before the corner and then cutting across the corner at a 45-degree angle very close to the actual corner, and then continue for another 1-2 inches using a longer stitch.

This pattern did not have you attach the sleeve lining to the rest of the lining before inserting it, which is what I have done in the past. Instead, I basted the armscye edges all together (lining and main fabric) just inside the seam allowance using a firm stitch and knotting it at each end. Then I pressed the sleeve lining armhole along the seam allowance, slid it onto the sleeve and sewed it to the lining armscye. I really liked this method as it holds everything more securely and I didn't have to tack the lining to the fabric anywhere.

Because the fabric was so ravelly, I did a Hong Kong finish on all the hems using silk organza just to be safe. Then I sewed the hem using a herringbone stitch. Then I folded the lining at just the right place so it would droop over just a little when it was finished and sewed it to the silk organza where it met the fabric using an invisible stitch.
And with no buttons or buttonholes to do, I was finished! It fits perfectly although I haven't taken a picture of it on me yet.

Update: Photos wearing the jacket.


Thursday, May 05, 2016

April catchup

Well I've been too busy to blog (or to sew much). The autumn is a busy time on a lifestyle block when you grow fruit and vegetables and raise cattle and chooks and try to live off of them. Most of the apples are harvested now and besides tons of applesauce and applejuice, I've tried to make cider. My first batch was just pureed Braeburn apples that had been frozen first and then thawed (presumably to break up the cell walls and release all the juices?). The mixture (with lemon peel and juice added) was left to ferment on its own for about 2 weeks and then bottled. It tasted lovely although I don't think it contains much alcohol. Certainly the bottles aren't looking like they want to explode!

My second batch of cider was supposed to be perfection - straight juice from 1/3 Cox-Orange and 2/3 Braeburn apples (no added water) and I put in cider yeast from Aqua Vitae, a brewing store in town. Well it still didn't bubble much even with the yeast added (maybe because I only had 7L and the pail is huge). After a week, I used a hygrometer to check the alcohol content - zero! I gave it all a stir, which got it bubbling for a day but now, another week later, it's not bubbling at all. So I'm going to have Ross taste it and see what he thinks (anything with alcohol in it doesn't ever taste the greatest to me so I'm a poor judge). If I get the thumbs up from Ross, I'll bottle it.

Although it's already May, I harvested all of these vegies this morning plus onions. The tomatoes plus some onions and peppers (sweet and hot) from the garden are now tomato puree. And the rest of the hot peppers are in the dehydrator. We're still harvesting parsnips, carrots, pumpkin/winter squash, silverbeet (chard) and I'm hoping the beetroot will get bigger soon. We've had a very warm autumn so far - up to 20-22C many times. But it's been very dry so we are getting desperate for rain. Soon we'll be feeding out hay to the cattle if the rain doesn't come.


Here's a photo I couldn't resist posting. Our dog Daphne found a possum up a gum tree recently and she couldn't resist trying to get to it. Unfortunately she wasn't too sure how to get back down! Ross did manage to save the damsel in distress.

The other fun thing taking me away from sewing this month was a tramping trip in the South Wairarapa on the Tora Coastal Walk. It was 3 days of walking carrying only our water and lunch. The postman delivered our bags to each destination! The food was all prepared for us in the evening and it was delicious. We went with friends plus several of their friends. We had good weather with great views of the sea and the rolling hills. Some native bush but not a lot. It was a private walk mostly through farmers' land.
At the top of The Trig

Doing dead ant exercises to get the lactate out after a lot of uphill walking

Ross managed to find a bulldozer at the top of a hill!

View of our destination at the end of Day 1


A fantail that was following us in the native bush on Day 3

 I have been slowly working on my daughter's quilt and only have 2 strips of the last border left to put on. Hoping to quilt it all before I see her in June, which may be wishful thinking, but fingers crossed I can do it. Here's a sneak preview of one of the 15 different block design/colour combos. More later.


 That's all for now.


Friday, March 11, 2016

StyleArc Kate dress

I've been looking for a casual but stylish dress that I could wear when I went out anywhere other than an audience with the queen. And I think this dress does the trick. Maybe I could even have an audience with the queen as it is the Kate Dress.

I bravely bought my fabric online without getting a swatch first and I wasn't disappointed. It's Impressionistic Rayon Jersey from Gorgeous Fabrics and it is unbelievably soft.  I prewashed it in the washing machine on delicate cycle with cold water. There is a 26 inch repeat so I bought extra fabric (4y instead of 2.8y) but it was way more than I needed.  It was a little difficult to cut out as the fabric didn't hang perfectly straight. The straight grain was on the pattern correctly so I ignored the 'hang' issue and cut it on the grain matching up the fabric pattern everywhere including the sleeves.
I thought about eliminating the tucks on the right front because I thought the print might look weird but I kept the tucks and I think it looks fine. I also kept the tucks on the sleeve and the tie in the back.

Instead of the tearaway Vilene and elastic along the neckline, I used 1/2-inch Sewkey knit staytape that I bought through Nancy's Notions. I fused it onto the wrong side of the edge, turned the edge in 3/8 inch and topstitched at 1/4 inch (3mm stitch length). I used 1/4-inch clear elastic tape to stabilize the shoulder seams, sewing them onto the back SA with most of the width of the tape on the SA side.

For all the main seams, I used my Brother overlocker with 4 threads (matching Gutermann polyester thread in left needle, beige overlocker thread in the other 3), differential feed at 1.2, stitch W 6mm, L 3mm and a 75 stretch needle. One little tip: when topstitching the front edges where the belt has been attached, make sure the belt is pulled away into it's final position for tying it before doing the topstitching. I wasn't thinking and didn't do that so had to take out the topstitching at the belt and redo it.

Conclusions: This dress fits perfectly and is so comfortable I could sleep in it. Maybe I better make a rayon jersey nightgown! The hang issue (see above) was not a problem at all. I wore it last night for the first time and my only complaint is that the nor'wester with gusts up to 100 k/h is not an optimal situation for a wrap dress! I would happily make this dress again.


Sunday, March 06, 2016

A Few Quick Sews

Quick Sew #1
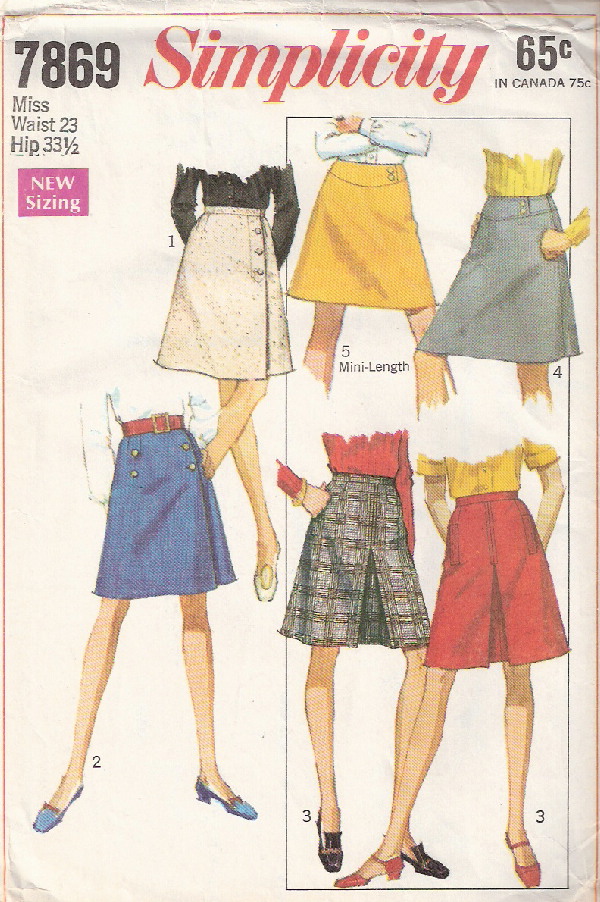
Simplicity 7869
Pattern from my stash dated 1968!! Yipes, I really must be getting old. Can't remember which version or what material I used back then. But I bought a cute cotton/lycra print at The Fabric Store in Christchurch that was mostly purple (I never wear purple) and decided to use it on this skirt pattern. 
I made View 5, 25 1/2 inch waist - same size I made in '68! I used a 0.5mmL, 2.5W zigzag fro the seams and then finished them with a 3-thread serge on my overlocker. Although not in the instructions, I underlined the waistline facing. The pattern says to sew the side opening edges of the facing before putting in the zipper but in retrospect, it would have been better to wait til I put in the zipper to do it.

Quick Sew #2
I then bought some 'First Class' viscose/spandex from Harald's Fabrics in Christchurch and made a Sewaholic Renfrew top View A but with 3/4 sleeves to go with the skirt. Of course, the best colour I could find was purple - so now I truly do wear purple! I prewashed the fabric in a cold hand wash.  I used a Janome blue tip needle and tried the Sewaholic's recommendation of a zigzag stitch (1mmW, 2.5mmL) and then overlocked the edges on my Brother overlocker using a ballpoint 70 needle. I'm not pear shaped (I'm 8 bust, 6 waist, 2 hip per pattern!) but I made B8, W8, H6 and it worked fine.  I'm very short waisted so I took out 1 inch at the waist and shortened the hem by 1 1/2 inches (measuring from the size 2 line). I sewed 1/4 inch staytape onto the back seam allowances at the shoulder with just a little going into the actual seam. For the ZZ around the neck, I used 4W, 2L.

Here's how it turned out. I love the top but any wrinkles in the skirt show through the shirt. The skirt pattern called for twill tape on the waist, which I used, but I don't really like it - feels too tight when I sit down. One of the threads has popped already on the waistband of the top so I guess I should have either used a shorter stitch length or just used the overlocker for the seams.

Quick Sew #3
McCalls 7290 jacket, view C, size medium. I bought a lightweight viscose/lycra knit from Fabric Vision in Christchurch. It has a black and white print on one side and 
solid black on the other. I prewashed the fabric on cold in the washing machine.  
I used a 75 stretch needle on my Janome sewing machine and Brother overlocker. I followed the directions as printed, shortened the bodice by 3/4 inch and ended up with a dressing gown (aka bathrobe). Should have made a small I guess! So I folded the sleeves up 2 3/4 inches and made cuffs. I did this by cutting off >1/2 of the back SA, folding the front SA over it and topstitching for the bottom 5 1/2 inches of the sleeve seam. I then pinked the hem edge, folded it over towards the right/print side, then pressed and topstitched it. Then I folded up the cuff and tacked it.

For the bottom edge, I cut off 2 1/2 inches at the back increasing to 4 1/2 inches off at the front. Then rather then just pinking the front and bottom edges, I folded them over to the inside along the bottom edge to approximately where the front edge starts to roll and then tapered to no fold and folded in the opposite direction for the front edges. It turned out fairly well and isn't too obvious where I transitioned. I don't think I'll make this pattern again though. I always seem to be fussing with where the collar and front edges fold. It might have worked better in a slightly heavier, less stretchy fabric. The pattern called for  'Fleece, Sweatshirt Fleece, Jerseys, Cotton Knits, Interlock, Sweater Knits'.