Thursday, April 12, 2018

Clothes Pin Apron

Save your back, save money and reduce carbon emmisions with one litle sewing project!


Is your power bill higher than you would like? Well here is a way to save some money with a quick little sewing project to spur you along.

The average clothes dryer uses 3 kW of power and the average family of four does 9 loads per week. At 45 minutes per load, that is 20.25 kWh per week and 1053 kWh per year. In comparison, the average refrigerator running 24 – 7 uses about 500 kWh per year. Where I live, power costs 37 cents per kWh + other fees so a dryer costs about $400 per year on average for the average family of four.

So then, why not hang your laundry outside in the sun? I happen to have the best view in the world for hanging laundry so it’s a no-brainer for me. 


Now you may have memories from your childhood of hanging out laundry using a bag of clothes pegs that was hung on the clothes line day in and day out and hosted occasional spiders, pine needles and other detritus in addition to the clothes pegs. Who wants to hang up their clothes with them? So here is the solution – a clothes peg apron. It’s cute, lives in the laundry basket, not outside with the bugs, and your clothes pegs are always within reach. 

A good friend of mine gave me her apron several years ago. Her husband’s sister made it as a school girl in Germany in the 1950s. Alas it is now on its last legs.

So I decided to clone it and make a new one. In fact, I made three. One for my husband’s daughter for Christmas, one for my sister-in-law for her birthday and now one for me!

So here is how I did it:

Materials:
1 ½ yards medium weight cotton (I used leftover fabric from a quilt I made for my daughter)
Thread to match

Cut 5 pieces:
1 – 25 inch wide, 22 inches long for main apron piece
1 – 15 inch wide, 13 ½ inch long for pocket (can use contrasting fabric)
1 – 18 ¾ inch wide, 4 inch long for waistband
2 – 28 inch wide, 4 inch long for ties                                                                                                                                       

Assembly (5/8 inch seam allowances unless otherwise stated):
  1. Fold and press sides of main piece at 1/4 inch and then fold again 3/8 inch and press. Topstitch at 1/4 inch from edge.
  2. Fold and press hem of main piece at 1/4 inch then fold again 3/4 inch and press. Topstitch at 5/8 inch.
  3. Mark pocket piece at 4 inches from each bottom corner along bottom edge. Mark each side 9 inches from top. Fold and press each corner starting and ending at the marks. Trim the resulting triangle diagonally 5/8 inch from fold. Press in the remaining sides and bottom at 5/8 inch.
  4. Fold and press top edge of pocket at 1/4 inch then fold again 3/4 inch and press. Topstitch at 5/8 inch.
  5. Center the pocket piece 6 inches down from the raw edge of the top of the main apron piece. Topstitch at 3/8 inch from the folded edge in a continuous seam starting at the top corner of one side and finishing at the other top corner, leaving the top edge unsewn. Topstitch again close to the folded edge.
  6. Sew long machine stitch at just under 5/8 inch and again at 3/8 inch along top edge of main piece. Gather to a final width of 18 3/4 inches to match the waistband.
  7. Sew one short end of each tie to each end of the waistband. Trim to 1/4 inch and press open.
  8. Fold waistband/ties piece in half lengthwise, right sides together. Sew across tie ends, pivot and sew until 1/8 - 1/4 inch from waistband seam (this will make it easier to finish the waistband). Trim tie seams to 1/4 inch, closer at corners, turn and press ties.
  9. Pin waistband to gathered top of main piece and sew. Trim to 1/4 inch. Press unsewn waistband edge at a scant 5/8 inch, trim to 1/4 inch and pin pressed edge in position with about 1/8 inch overlapping the previously sewn seam. With right side up, stitch in the ditch starting and finishing 1/8 - 1/4 inch either side of waistband (ie on the ties) to close the little gap left in the previous step.
  10. Press. Fill the pocket with clothes pegs. Get the laundry out of the washing machine. Put on your new apron and hang out the clothes.

Enjoy!

Tuesday, August 08, 2017

Greening up

Follow my blog with Bloglovin


The black is miraculously turning green at last. The trees still look pretty ugly but the grass is growing and it makes such a difference.
View from bottom of the valley. Our house is on the hill at the top right.
For comparison, here's what the view of our hill looked like at the beginning of March,


We have had a lot of rain this year - almost a meter since Jan 1 - and a couple of weeks ago, we had 15 cm in two days! As a result, there were lots of slips. Ross had to get a digger in so he could get out the driveway to pick me up at the airport! There are lots of slips going down our valley as well.

Slip coming down through burned Mahoe trees

And the culvert on our stream that was burned out in the fire but still holding its tunnel shape was finally washed out.
Daphne and Phobe contemplating alternatives to jumping over!
But all that is easily fixed once it's dry enough for the digger driver to get down there.

Huge mats of broom are coming up in some places. We might join in with neighbours and do some aerial spraying in September or October. I also thought we might see if we can find some older broom with the broom gall mite on it. There was a lot of it on our property pre-fire but it was all burned. But maybe some of the neighbours have some surviving. It would be good to get several branches and distribute it through the new broom. 
Broom seedlings coming up
Another couple of months and we should be getting a hint of which trees are surviving. Lots of the cabbage trees are alive and virtually all of the flax has started to regrow. Looking forward to springtime!

Ross' Overcoat aka Vogue American Designer 1330

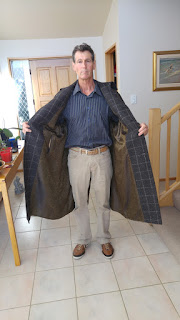
Another long overdue post! About one year ago, my husband Ross put in an order for an overcoat. I found a vintage Bill Blass pattern on Etsy in size 42. We then went fabric hunting and found a wool (80%)/acrylic (20%) blend check in dark brown and tan at Harald's in Christchurch. We also found a paisley acetate lining fabric. So by October I was ready to roll. Unfortunately, there were many interruptions including sewing Christmas presents, our big fire, making a baby quilt for the daughter of a good friend back in California. So I didn't finish it until May. Then I went to the US and Canada to visit family. But last weekend, Ross finally got to wear it out to the symphony on a chilly winter's evening.


Materials used:
Mid-weight wool (80%)/acrylic (20%) for exterior and front facing
Acetate for lining
Fashion Fuse woven interfacing 55 g/m2 as interlining for whole front (excluding revere and excluded SA from center front to corner and down front edge), upper back, front facing, sleeves to 2 inches above elbows, trimmed 1/4 inch off interfacing wherever it was included in the SA
Stayflex woven interfacing 79 g/m2 for revere (not SA), upper collar, pocket welts, sleeve tabs
Linen for undercollar interfacing
Medium weight hair canvas for breast plate from Hawes and Freer
Columbina domette from Bias Bespoke Supply Company
Raglan shoulder pads from Hawes and Freer
Guttermann polyester thread; contrasting topstitching thread for topstitching
Black cotton twill tape (preshrunk) on back lower foldline along vent, along armscye seams, and at cuff fold line
Horn buttons from Hawes and Freer

Machine info:
Janome Memorycraft 6600 Professional; 2.5mm stitch length (3 for topstitching); 4 thread tension
70/12 universal needle; jeans needle for topstitching

Changes from original pattern:
1. I couldn't find a good matching wool fabric so instead of lining the whole coat with contrasting fabric, I cut the front lining piece in two lengthwise, added seam allowances, and made the front half a facing made from the primary fabric. I lined the rest of the coat with paisley acetate lining.
Front lining cut in half and SAs added

Resulting front facing and front lining
2. I added a breast plate made with hair canvas and domette. I created the pattern pieces based on David Coffin's chapter 'Techniques for a Topcoat' in the book Jackets, Coats and Suits published by Threads magazine in 1992 (found on abebooks.com). I used the hybrid tailoring method from Alison Smith's tailoring class on craftsy.com. 

3. For the collar, I used David Coffin's technique on interfacing for a convertible collar from the same chapter described above.  This technique involves making two roll lines, an upper one for when the coat is buttoned to the top and a lower one for when the lapels are open. The interfacing is cut on the upper roll line and then rejoined using lining fabric(see photos below). I padstitched the undercollar. Sorry, I can't find the photo of all the padstitching. I also added centre back seams to the collar and undercollar so I could match the plaid to the back of the coat at the centre back. 


 4. I added a breast pocket on the left side using this method from The Sewing Academy.  Because of the breast pocket, I couldn't make a double entry pocket on this side. But I don't suppose Ross would have a lot of need to get through his left coat pocket into his pants pocket as he is right handed.

5. I made bound buttonholes for all the large butonholes down the front using the ebook How to Make a Bound Buttonhole by Karen Ball. I used automatic key type buttonholes for the cuffs and the top button on the collar.

Markings for bound buttonholes
With welt

Preparing the back window
6. I added raglan shoulder pads.

Other details:
I made a muslin first but I don't think it helped much as the fabric was so much lighter. 

I thread basted all the seam lines with cotton thread run through bees wax (which helps avoid thread tangles) as I was expecting to make alterations. When I did the first fitting with the shoulder pads basted in, the upper lateral sleeve was too full. I didn't want to take in the outside sleeve seam as it was already sewn and topstitched so I tried taking it in at the armscye - bad decision - it didn't work at all. So I bit the bullet and took out the topstitching and the seam. I then took in that seam line starting just above the tip of the shoulder, decreasing gradually to 1/4 inch of the SA emoved from each and tapered back to zero at the elbow. I also had to take in the side seams up to 1 inch on each piece. I guess I should have bought a size 40!

I made the fold line for the revere from just above the the top large button hole to the notch at the neckline. 

I reinforced the pocket facings with linen as I didn't think the lining fabric would be sturdy enough. for what men put in their coat pockets - keys, change etc.

I did a fair bit of tacking at the end: the double entry pocket welt to the chest plate, the undercollar to the outercollar at the neck seamline, the lining to the main coat at the bottom of the armscye.

When I pressed it at the end, I used lots of steam and for the collar, I pressed it around a rolled teatowel. 

And here is the final result. I'm happy and so is Ross!


Sunday, June 04, 2017

Fire Feb 13, 2017!

Sorry for the 6+ month gap in my postings. Life was very rudely interrupted by a huge fire on Feb 13. It started on Early Valley Road near the bottom of our 3.5k driveway and appears to have been caused by a fuse dropping out of a utility pole. Ross noticed huge amounts of smoke coming up the valley (there was a strong norwester). We put the dogs and a couple of essentials in the truck drove down our drive about 1k and found neighbours frantically escaping up the hill. After opening up stock gates, we decided we shouldn't drive back home as there was no vehicle egress route from the top of our property. So we drove over the neighbour's paddocks to a neighbour's driveway that goes up and got to Summit Road at the top of our ridge.  It was about 6:30pm at that point.


The fire rapidly moved up the hill. Our house is just behind the trees to the left of the bright flames in the middle of the photo. By 10pm, the fire was too close and the smoke was bad so we had to leave, assuming our house would be gone soon. This was confirmed by a neighbour on the next ridge north who could see our property was surrounded by fire. We went to a neighbour's house away from the fire for the night.

The next morning, our neighbour called to say he could see a green roof!! We couldn't believe it. Our house had miraculously survived. Well it wasn't a complete miracle. Ross had always been concerned about the possibility of fire and had kept the small lawn in front of the house short and well watered in the summer. And we always kept stock to keep the grass down in the paddocks close to the house. Plus Ross had trimmed the branches on the large trees behind our house to about 7 ft high and had cleared all the debris from under them. As Ross' father used to say, 'the harder you work, the luckier you get'.  It was sobering to see the scorched ground under those trees and realize that if Ross hadn't done that clearing, they probably all would have gone up in the fire and then the house. The fire came within 6 ft of our house at one corner and about 10 ft at another. Here's a drone photo showing how lucky we are to have our house. Over 100 of our 117 acres burned.
We went up to the house the next morning and this was the view before we got there:
And here's the view from the other side of the valley:

We spent the next 2 days putting out residual fires around the property with backpacks of water plus some help from volunteer firefighters. Most of the pipes from our two 30,000L water tanks burned so the tanks were empty the next morning. But all that water leaking out must have helped put out the fire.

The fire raged for about 5 days eventually covering 5000 acres and burning down 9 houses including our next door neighbour's house and two others on our street. The wind changed on day 3 and that's when things really got out of control. Because everything was burned around our house, we weren't too worried about our place even though the wind was blowing the fire back in our direction.
By the fourth night, we were able to stay at home for the night but it was probably stupid as the smoke stench in the house was dreadful despite leaving it open every day. It was almost 3 months before people didn't notice the smoke smell when they walked into our house.

We lost four sheds, most of our fencing, two heifers and only about 1/3 or so of our vegetable gardens  in the fire. Our three lambs survived as did all of our chickens - thank heaven for that huge chook palace all covered in roofing iron! Our old cow Milkshake turned up two days after the fire looking pretty bad but with some fresh hay and water she started to perk up. And after about a week, she wandered over to our neighbour's bull (the fences were burned and not much of a barrier) so she must have been recovered enough to answer nature's call!

Our lemon tree!
It took about two months to clean up all the shed debris. Our 24m long propogation area with office, shade house, glasshouse and raised beds took forever! As we have decided to turn it into grass, gardens and a sitting area (maybe even with a spa!), we had to remove all the gravel and underlying half burned plastic sheeting that had been there for 20 years. I'm now most of the way through digging over all the compacted clay soil and adding gypsum and compost.

Ross is a happy man now as he has rebuilt the retaining walls near the house and the steps down from the house and he is now rebuilding sheds.

And we've even managed to get away to a friend's bach at Lake Tekapo for 2 nights!
While Ross is building, I am planting (or digging over compacted clay!). I've planted over 300 natives so far mostly along the driveway. But I also put some in a steep bit of our garden after first putting in coir matting.

My friend Rosemary helping with planting
The retaining walls have been repaired and the fence lines are bulldozed ready for the fencer and look how green things are getting. Although we spent a lot on aerial grass seeding, most of the green is broom, California thistle, bracken fern (native at least!) and blackberry! But at least it's green.
Digger driver putting in concrete (non-flammable!!) poles for retaining wall
Some trees that burned have new leaves and the tussock grass is sprouting. The flax has survived remarkably well. After being burned almost to the ground, most of it is coming back.
Tussock regrowth

Grass growing along creek
And even the burned cabbage trees still look cool!

Friday, November 25, 2016

Busy Springtime

It's been a hectic couple of months here on the farm. We've had a lot of gray, drizzly weather - 211 mm rain in October, less this month. But we did have 2 days of 28C this week - one extreme to the other!

Our newest arrival on the farm is Eric the Perendale ram. We got him a month ago from a neighbour when he was 2 months old.


I bottle fed him until a few days ago and now he's been weaned although he still persists in 'bonking' me each morning to try and get some milk. He's growing fast and looks like he's a little bigger than the dogs already. I am sure he is eagerly awaiting the arrival of some ewe lams to keep him company.

One real benefit of all the rain as that the grass is growing like crazy so the cattle are very happy. 

We didn't have any live calves this year unfortunately. Milkshake, our grouchy old cow, delivered twins a week ago (very uncommon in cattle) and they died. They looked normal externally so I don't know what happened as we got there just after she delivered. She had cleaned them up beautifully so I don't know if it was a cord problem. Poor Milkshake was just bursting with milk and there were no calves to give it to. Our neighbour had 2 calves without a mother so we put them together but it didn't work. They are 3 months old and mostly weaned so perhaps the urge to suck was gone. Fortunately Milkshake is drying up now. 

The other interesting event on the property was with our bees. The hive seemed to be very full as they were lining up in masses waiting to get in. One day, Ross saw a huge swarm set off down the valley. There is a box covering a water pipe junction at the bottom of the valley and it is full of bees now! The day after the big swarm, I found a huge mass of bees on a flax plant. They stayed there for several days then one morning most of them were gone and 3 days later they were all gone. Apparently when bees decide to swarm and find a new home with their new queen, they often find a spot close to the hive where they wait for the scouts to get back and let them know where their new home is going to be. I'm guessing that in the centre of that mass of bees is the new queen being carefully protected. I don't know why they left in 2 groups a few days apart. Maybe the second group just went back to the original hive? Or could there have been 2 queens? I'll have to ask the guy who manages our hive if he knows.


The vegie garden is looking great and has required a lot of weeding because of all the rain. We ate our last cauliflower from the winter garden, the artichokes are coming on, and the new plantings are now popping up. 


We have a track going through all the kanuka trees below our driveway. We put it in several years ago and have to hack away regrowing gorse, broom, and blackberry every year. But the good news is that the kanuka are getting very large and all the little native trees coming up around the kanuka are getting much larger, especially the mahoe. 

Well that's it from our little patch of heaven. We're off to pick up 2 bales of shavings to put on the chookhouse floor after we clean it all out - a big task that involves scrubbing all surfaces down with cleaner but fortunately only has to be done once a year or so.